Wednesday, February 20, 2013

Carrot Cake: To frost or Not to frost?

I know a lot of us have had some awful carrot cakes in our time but, please let me show you, how you can make it so your family will be coming back for seconds, no doubt!


My carrot cake recipe came from my mama's recipe box, I have altered some things here and there but, it has not taken away the wonderful taste of this classic carrot cake.  Another reason why I love this cake is because, it can be made as a breakfast bread, minus the frosting.  It can be made in a 13X9 cake pan and topped with some icing.

Or you can go over the top and make a three layer cake, loaded with cream cheese icing and coconut.  The third option is my son's favorite cake so much, it is now his birthday cake every year.  Mind you, my son is not a big vegetable eater by the way.

Ingredients

2 cups white flour (no self rising)

2 cups carrots (grated)

2 cups granulated sugar

1 cup (can) crushed pineapple

1 cup (sweetened) coconut flakes

2 cups walnuts

1/2 cup buttermilk

1/4 cup canola oil

1/4 cup butter

2 (whole) large eggs

2 egg yolks

2 teaspoons baking soda

2 teaspoons (ground) cinnamon

1 1/2 teaspoons salt

1 teaspoon vanilla extract

1 ripe banana (mashed well with a fork before adding to your mixing bowl)

1/2 cups applesauce (homemade is better)

Frosting Ingredients

1 1/2 cups butter (unsalted)

2- 8 ounce packages cream cheese

5 cups powdered sugar

1 Tablespoon Vanilla extract

You can decorate your layer cake with (sweetened) coconut, nuts and I will even toast coconut and add that, it just depends are what I have and the mood I am in.

We're Off


Preheat your oven at 350 degrees.  Grease and flour your cake pans and set aside.

In a big mixing bowl place your sifted flour, baking soda, cinnamon and salt, mix then set aside.

This next step is essential:  Empty your can of crushed pineapple, open and place your pineapple into a mesh strainer.  With the back of your wooded spoon press out as much of the pineapple juice as you are able.

If you skip this step, you will be baking this cake for a long time and only end up with a burnt cake, that still jiggles in the middle.  

So please take the time to do this one step.

Let's Get Nutty...


My husband is so sweet he bought me a kitchenaid mixer but, if you do not have a stand up mixer than just use a bowl and a hand mixer, it will be just fine.

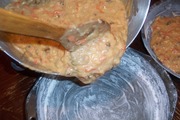
In your mixer/big bowl place your oil, eggs, sugar, buttermilk, carrots, coconut, pineapple, banana, applesauce and your vanilla extract. Mix on low for 2 minutes or until all ingredients are well incorporated.

I find it takes less time in a standing mixer. Add 1/2 your flour and mix for around 30 seconds and then add the other half of your flour, mix for another minute or until all flour is well incorporated.

Then stir your nuts into your batter with a spoon.

Pour in that Goodness


If you are making a sheet cake, pour your finished batter into a (well) greased & floured 13X9 cake pan, bake for 40 minutes or until a tooth pick is inserted in the middle of your cake and the toothpick comes out clean.  Cool on a rack and then frost.

If you want to make this a breakfast cake, omit the frosting, serve warm.  Making sure you have plenty of butter and honey to top it off.

Now if you are wanting to go all the way and make your carrot cake a bit fancy...

Pour your carrot cake batter into 3 'well' greased & floured 9 inch cake pans.  Bake for 30 minutes or until a tooth pick is inserted into the middle of your cakes and the tooth pick comes out clean.

Start Your Engines...


The day I am going to make this delicious cake, I take my butter and cream cheese out of the refrigerator and set them on my kitchen counter in the morning.  You need room temperature butter and cream cheese, or you end up with a chunky and not so tasty icing.

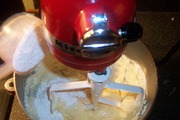
Place your softened butter and cream cheese in your mixing bowl, mix for 2 minutes until both ingredients are well incorporated and starting to get a bit fluffy. Turn your mixer on low and start to add your powdered sugar, one cup at a time.

Allow the powdered sugar to absorb into the butter/cream cheese before adding the next half of cup. Repeat until all powdered sugar is gone.

When all your powdered sugar is incorporated add your vanilla extract, turn your mixer up to medium and mix for 2 minutes, until you get a fluffy consistency.

You only need half of your icing if you are making a sheet cake, place the other half into a container (I am using Alabama Tupperware) and place in the freezer for your next cake.

When you want to make another sheet cake, take out your icing, place it in the refrigerator over night to thaw out.  When you are ready to use the icing, mix well.

Frosting 101


When I stated earlier that you are to grease and flour your cake pans, I really mean this when you are going to make this cake a 3 layer cake.  By well greasing and flouring your pans, you are then able to take these lovely cakes out with ease.

Also very important is, make sure your cakes are cooled down completely.

Lay your first layer down on your serving plate.  I do not cut this cake so as to make it even, I start with first layer and if I see that the first layer is a little lopsided, I will push it down, this cake if very forgiving.

When even then take 1/3 of your icing and ice the top and sides of that layer.  Repeat until you have covered all three layers.  I would usually tell you to place some wax/parchment paper around the cake, so you have a clean plate but, since you are adding coconut around the side, no one will spot a mistake and also, the coconut will hide any of the over flow of icing.

Make them Smile...


Yes there was a bit of work to be had but, all in all, putting a smile on the face of the ones you love it so well worth it.  Once you have made this cake a few times, it really comes a easy recipe and one, I am sure you will be serving many times over.

Homemade Applesauce

When serving brunch this is a wonderful breakfast bread to add to your mix, also try adding...

Baked Potato Quiche:  Mama's Got 'it' Loaded

All photographs are the property of Denise O.  Do not use unless you get 'my' written permission. All written material is owned by Denise O, it will not be 'used' (sharing my article is different, it is acceptable and appreciated) without 'my' written permission.  Just keeping it real folks.:)

Homemade Applesauce: Orange, Apples & Cinnamon, Oh My!

Very few aromas make a home warm and inviting than the smell of apples and cinnamon cascading throughout your home.  This applesauce recipe smells heavenly while cooking. It also is a very delicious dish on its own or added to a recipe to bring that recipe over the top.


Ingredients

8 apples (I used 6 red delicious and 2 granny smith)
1 cup apple juice
1/3 cup sugar (white)
1/2 cup honey (I used orange blossom)
1/2 cup orange marmalade
1/3 cup packed brown sugar
2 cinnamon sticks
1 lemon
pinch of salt

I like to use organic fruits, I know they are usually more expensive but, I will let you in on one of my secrets. When I see organic apples on sale and the price is the same as regular apples, I stock up.  I then will make a double or even a triple batch of this applesauce, as it stores well in your freezer.

AKA Alabama Tupperware

I place some (enough to feed my family as a side dish)  in freezer container so I can just take it out the night before I am going to serve my family say a, pork chop dinner.  I will also measure some of the applesauce out and place in quart side freezer bags, so I can take one out when I want to make the other recipes I use this applesauce in.

Peelingsssssss

In 2 large bowl add some cold water, cut your lemon in half.  Squeeze one half of your lemon in each bowl and add the halves to each bowl.

As you are peeling your apples, allow the peels to drop into one of your bowls.

When your apple is peeled, place your apple into the other bowl.  Continue until you have peeled all your apples and they are resting in your lemony water bath.

Yes I do have a surprise for the peelings, just set them aside.

Cut & Scoop

After you have peeled all of your apples, cut your apples in half.

Take a melon scoop and take out the core. Then cut each half of your apple and them them in quarters.

Place all your cut apples into the lemon water, until you are ready.

By placing them in the lemon water will help them from browning.

This whole procedure will only take about 10 minutes but, your apples (if not placed in the lemon water) will brown with a minute or two, so do not skip this step.

Pour that Liquid Gold


Place your cut up apples, apple juice, sugar, ornage marmalade, honey and 2 cinnamon sticks into your crockpot.  Place the lid on your crockpot, set your crockpot on high for 1 hour, stir, replace the lid and lower the setting on your crockpot to 'low'.

Cook for 4 hours, stirring every hour.  After 4 hours is up then add your brown sugar, mix well and then replace the lid.  With the temperature off, allow your apple sauce to sit for 15 minutes, mix and serve.

No Waste Here


If you are like I am and want to use most 'all' of the produce you have bought then continue with this next step.  You can make your bundles while the applesauce is simmering away.

Take your apple peels and split them up into six lunch baggies (no sense in using heavy duty bags) and set aside.

Then go to your spice cabinet and take out some of those whole cloves that have been just sitting on your shelf since the last holiday season, add 6 or 7 cloves per baggie.

Then place one cinnamon stick into each baggie, close the baggies up, place all our baggies into a gallon size freezer bag and place into your freezer.

Now when company is coming or you see that ever too curious neighbor heading your way, then grab a bag, place into a small sauce pan, take out a baggie and dump the contents into your pan.  After the apple peels & goodies have come to a boil, turn down the heat to a low simmer and just let that lovely aroma cascade all through your house and then you have delicious smelling home.

I Can Hardly Wait to Dig in


Now, I am sure you will find many ways to use this applesauce.  Mixed into a bit of yogurt for breakfast, placed into a cake recipe to replace most of the oil.  Just keep in mind the flavors you have going on in your pot and then allow your imagination take you away.

Yes  I do use this applesauce in a few of my dishes but, my absolute favorite way of eating this sweet goodness is sitting in a bowl next to a few pieces of ham and a side of green bean casserole.  Which ever way you want to use/serve this applesauce, I am sure your family will enjoy ever bite of it and ask for more.

The recipes I add my homemade applesauce to is...

Carrot Cake:  Done Three Ways!

Southern Style: Sweet Potato Casserole

All photographs are the property of Denise O.  Do not use unless you get 'my' written permission. All written material is owned by Denise O, it will not be 'used' (sharing my article is different, it is acceptable and appreciated) without 'my' written permission.  Just keeping it real folks.:)

Thursday, February 14, 2013

Vegetarian Collard Greens: Done Mama's Way!

I do admit that I use to make my collard greens with some kind of pork added to them for flavor but, then I experimented with this dish and came up with a delicious yet healthier version.  Why not.


It's Easy...

Nothing can intimidate a cook more than trying to make some collard greens, yet it is a very simple process once you have learned just how to make this lovely pot of deliciousness.  There are just as many recipes as there are people that cook collard greens.  

Yes this is a vegetarian recipe and you might turn your nose up to that very fact but, I promise you if you make them my way, you too will have your family sopping up that pot liquor with a nice biscuit, as they finish up that bowl of greens you placed in front of them.

Ingredients...

4 pounds collard greens (fresh)
2 onions
1 bell pepper (red, yellow or orange)
3 stalks of celery
2 (Large) carrots
6 tablespoon olive oil
6 garlic cloves
3 teaspoons kosher salt
1 1/2 teaspoon smoked (sweet) paprika
1 1/2 teaspoons fresh cracked black pepper
1 bay leaf
2 tablespoons honey
A pinch or two of red pepper flakes

Wash those Greens 

When you get your bunches of collard greens home, cut off the bottom stems, leaving only the leaves.  Fill a 'cleaned' out sink (or use a 'big' bowl) with cold water, add your collard green leaves.  

I think of my hand as a washing machine and I start the rinse cycle on these greens, making sure I get all the dirt off.  You might have to drain your water and repeat this process if they are really dirty, as most are.

Cut UP

As I am removing my collard greens from the sink, I stack them in a neat pile, this will help when you go to cut them up.  

After you have stacked your collard greens, you then want to cut most of the stem and the (thick) vein that runs through your greens off.

Do this to each and every leaf but, as you start to get to the middle of your collards you will notice you have a few small leaves with hardly any stem.  

Don't worry about removing those stems, just lay them on the stack of those you have already taken the stems and veins out of.

Roll & Slice 

Yes as I am taking the stems and veins out of each leaf I stack them in another pile and I make the pile as net as I am able to.  This will help with this next step you are about to take.

Take about 5 leaves as a time, roll them up and cut cross ways, about one inch thick, repeat this process until you have finished all of your collard green leaves and set aside.

I am sure you will be amazed just how much of these greens you have after cutting them all up but, they will shrink down while cooking and you then will be amazed how little you have after they are cooked.

Did I hear "Veggies!" 

Slice your carrots into 1/2 inch rounds.

Dice your celery in a medium dice.  

Dice your onions in a medium dice.

Peel your garlic cloves cut in half, saving one whole for later usage.

Cut your bell pepper into strips. 

In a big frying pan, place 2 tablespoons of olive oil and then add your (minus garlic cloves) vegetables.  

Saute until they are soft but not to the point of turning brown.  Then add your garlic cloves and half your salt and saute for one minute.

Bundle UP 


Cheesecloth, you just gotta love this stuff, what a better way to add flavor and yet those worn out vegetables will be easy to take out.  At times it is so frustrating looking for that one bay leaf you pot in your pot of goodies, this way, you just scoop one bag out and no hiding seek is played on you.

Place your collard greens into your crockpot, yes it will be overflowing but as I have stated before, they will shrink down.  On a plate, place a double layer of cheesecloth, place your cooked vegetables and 1 bay leaf on the cheesecloth and then tie it off.  Grab the corner of one side of your cheesecloth and then the opposite side, tie up and repeat with the other two corners.  Place the bundle into your crockpot.

Flavor Town 

In the same (big) frying pan you saute'd your vegetables, on medium heat, add 2 tablespoons of olive oil.  

When the oil is hot add your whole garlic clove, paprika, cracked black pepper, pepper flakes and the rest of your salt, saute for about one minute. 

After one minute is up add three quarts of water and your honey, allow the water to come to a boil and then ladle the broth over your collard greens. 

I know you might be thinking, why not just pour the juice over it well, I use the ladle so I can control the flow of juice, I have a lot of collard greens in the pot and I want to make sure I am hitting all side of the crockpot, so as to shrink the greens down a bit, so the lid will fit just right.

Place your crockpot on high for 1 hour, stir your greens and then lower the temperature and cook on low for 6 hours.  After the 6 hours take out your cheesecloth, taste.  If it needs more salt or pepper, this is the time to add it.

That Easy folks


Yes, it is just that easy and delicious, oh lordy are they good.  Us folks here in the south call the broth that the collards, vegetables and spices 'pot liquor'.  So when you dish you up a bowl of these delicious collards, add some of that pot liquor to your bowl, I am sure you too will be sopping that goodness up.

Here are a few more of my vegetarian recipes...

Southern Style:  Boiled Peanuts

Potato Salad:  Done Mama's Way!

Vegetarian Eggplant Parmesan 

All photographs are the property of Denise O.  Do not use unless you get 'my' written permission. All written material is owned by Denise O, it will not be 'used' (sharing my article is different, it is acceptable and appreciated) without 'my' written permission.  Just keeping it real folks.:)

Tuesday, February 12, 2013

Valentine's Day: Baskets & Gifts III

Yes they might be all grown up to many but, not to us parents.  I love sending my daughter packages, she now lives in Texas and of course, I live in Alabama.  I want to send more than just a card, as she is that important to me.


I could just...

Throw all these goodies into a box and be done with it but, that is just not my style and also, I love her too much to do just that.

With a few inexpensive packaging, your gift will bring so much love, they are reassured that yes, you do love them, they are and will always be special to you.

Can one package do that, you bet your last bottom dollar it will.

I would like to point out one important suggestion...

Buy these holiday boxes, paper and decorations a day or two after the holiday is over, the savings is tremendous, from 60% off and on up.

Make 'it' Pretty Folks


Okay, I admit it, I did buy a bunch of hair accessories in the clearance bin, I tried to take off the stickers but, I had ripped off half the paper while doing so.

How I combated this problem was, I had taken the hair accessories out of the package.  I then placed them into these adorable Valentine small Chinese take out containers.  After I placed 1/4 of a Valentine theme napkin inside and then closed them up.

I also placed a small bear globe (bears are 1 of her favorite things) into one of those Chinese take out containers, for extra protection.

I will add her Valentine light up ring in her Valentine cup and then stuff her frogs (Also one of her favorite things) inside of the cup, leaving the head exposed.  We are saving space here folks.  Mama taught me how to pack things many of years ago.  Mama being a wife to one in the AF and traveling around the world, you learn a thing or two about packing.  No empty spaces should be in any box, or you just have too big of a box.

Stuff IT!


When stuffing their sweet Valentine's gifts into their box, think of how it will look when they open it, is it just thrown in, or did you take the time to place their goodies just so.  So as it puts a smile on their face as soon as they open your package of love you sent them, if not, re-pack.  It really means a lot, first impressions folks, can make or break it all.

I then placed a little extra napkins surrounding her bear globe, I will lay the rest of the package of Valentine napkins on top of this masterpiece, then a few bags of popcorn on top of those napkins and then all my space is taken up.  As she pulls back the popcorn and napkins, she will see a package made with love.

Why the popcorn might you ask, well my theme for her and her husband is movie night, yes I placed a few DVD's inside and other than the trinkets I picked up for her, the rest is a romantic movies night package for them to enjoy.

If You Don't Mind...

I was once challenged (dared) to try and write a poem.  Although it is a simple poem, I am sure you too will see that the simple things in life, the day to day grind, is not so bad. Especially when you have ones you love in your world.

Pictures of Life...

Just might be...

A child looking us in the eye,

as he smiles so sweetly.

All we have to do is open our eyes and we will see...

beauty surround us,

you and me.

Pictures of Life...


Will sometimes be, watching a dog being so carefree.  We just have to open our eyes and we will see pictures of life surround us, you and me.

Pictures of Life...

Just might be...

You son looking at you, with all the love...

Of a child of three.

All you must do is open your eyes,

I promise you will see...

Beauty surrounds us, you and me.

Pictures of Life...


Just might be, a brother working hard for his sister.  That would be me.  We should all look around and see, that we must open our eyes.  To you and me.

Pictures of Life... 


Just might be...

Your daughter and her husband making a life together...

and they 'let' you see.

If you don't look around, you will never see...

All the beauty that is surrounding...

You and me.


Pictures of Life...


Might not always be a picture you and I want to see but, if we don't open our eyes.  How can we see, if someone needs us, you and me.

Pictures of Life... 


Could also be...

The mother of my grandson handing him to me.

If we will not take off that lens cap...

How can we see...

What others do, for you and me.

Pictures of Life... 

The poem I just shared with you and me...

Might be a simple poem for you to read but...

I find 'simple' to be...

The most powerful word in the dictionary.

We just have to open our eyes and we will see.

That we have pictures of life...

That surround you and me.

Folks... 


I have taken the challenge, as you can see and even if it not a 'great' work of art, do you at least agree...

That the most powerful pictures in life are the simple ones...

To you and me.

All I am saying is, don't grumble as you buy a gift for the one you love on Valentines day, instead look around at the pictures the ones you love give you.  I am sure you too will stop and remember, just how important they are to you.

Why not!

My wonderful husband will be working on Valentine's day and this woman will not be awake to serve him bed in breakfast at six in the morning.

After you have been together for over two decades, you both are allowed to sleep in, it is a law or something.

Also, we are smart enough to know that Valentine's Day is more than just one day a year, when you are in love.

So since Dan will be working, I decided to make a quiche for him, he will grab a few pieces and off to work he will go.

Well, I do have 364 more days until next Valentine's Day to make it up.

BUT.... 


If you have the time, make a good size breakfast you can share and do not forget a few pieces of chocolate, it will set the ambiance and who knows what might happen.

Happy Valentine's Day!

Valentine's Day: I
Valentine's Day: II

Baked Potato Quiche:  Mama's Got 'it' Loaded!

All photographs are the property of Denise O.  Do not use unless you get 'my' written permission. All written material is owned by Denise O, it will not be 'used' (sharing my article is different, it is acceptable and appreciated) without 'my' written permission.  Just keeping it real folks.:)

Monday, February 11, 2013

Valentine's Day: Homemade Baskets & Gifts II

Valentine's Day, just as it is with Christmas, is a holiday where we give to others.  I take out the 'so called' commercialism and how the card company (why not) are making money on us and just think of giving to those I love and appreciate.  Bugg agrees with me...


Bugg loves to give


Make 'it' More...

I am going to demonstrate how to put together a Valentine basket, once you know the basics, then you will be able to master this easy craft and no longer pay 'way' too much for your next gift basket you will share with someone special.

I can not express enough how important it is to buy special occasion decorations right after that occasion, then you are able to get items for 60% off, on up.

If you are buying it just straight out, in the height of the holiday, these two baskets will not even break the bank.  Actually making these two baskets will cost less than one gift basket you will buy.  Plus it is not full of filler, just tasty treats.

What you will need...

2 plastic heart baskets ( I purchased mine at the dollar store, 2 for $1)
1 package (6 count) red treat boxes
1 package decorated Valentine (or any occasion) treat baggies
1 package red velvet hearts
12 lunch baggies
1 package clear basket cover bags (there will be 12 in the bag, you only need 2)
Tape (I use duct tape, it is much more sturdy & it comes in all kinds of colors and prints)
Scissors
Yarn
Ribbons
Bows
Cookies

We're Off!


Take all your boxes out and fold them, the decoration will be on the package and make sure to place some tape on the bottom of the boxes, so as to make the boxes a bit more sturdy.

Place two sheets of tissue paper in each basket.  The best place I have found to get tissue paper is at the dollar store.  They usually have all the colors and patterns you will need and a bit cheaper than if you bought the same paper in a craft store.

Start Packing! 


You will need 3 boxes for each basket, so make the decision which cookies you are going to use for each basket.  I used the less decorative cookies in the two bottom boxes.

Place 3 to 4 cookies in a sandwich baggie and place inside of your red box.  Make sure the handles are able to close very easily.

Bend the handles down and place some tape on the handles so the box is closed.  Then roll a piece of duct tape on one side of the box.

Remember, we want to pack as many goodies in this basket as you can, there is nothing worse than to get a basket and half of it is a bunch of paper and 'empty' cardboard boxes.  Your boxes are full.

Stuff It! 


Take your first box filled with cookies and place it in your basket, tape side down.  Make sure to push down  hard on the first box but, not so hard that you will break the cookies inside.

Repeat with your second box and place it on top of the bottom box.  Make sure it is as centered as you are able to get it.  Also try to make sure the second box is even, so when you top it with your top box, your top box does not lean, if need be, use more tape.

The Tops


Now take one of your treat bags and line up your cookies, so they will look pretty, take the tie that comes with the bag and twist the cookies tight.

I find if I place the cookies how I want them, I then twist them up tight.  I use the table as a second hand, I am able to place the tie at the bottom of the cookies, so much easier and it is more secure.

Take the tail of the excess treat bag and stuff it into the third red box, place some tape at the bottom of your box and place the box (standing up) on top of the second box, you have already placed in your basket.

Bag the Pretties 

I saved the heart cookies or just save the best cookies for last.  Once again decide which position looks the best.

I will take the bag after I have decided I like how it looks in the bag and hold it up to the basket, see how it looks.  At times it looks great but, at times I need to adjust the cookies.

I am sure you have noticed I went back to the clear sandwich baggies.

I did this because the heart shaped cookies look great all by themselves, they don't need any added decorations, they are pretty on their own.

After you have gotten your cookies placed how you like them, then once again twist the baggie as tight as you are able to and then tie some yarn around the bottom of the cookies, using the table as an extra hand.

Tuck one in the front of the basket and one bag of cookies on each side of the boxes, tucking (gently) and moving here and there until you are satisfied in how it looks.

Basket full of Goodness...


Now place the red velvet hearts on each side of the center box, towards the back.  Get one of your clear basket covers and cover the basket.  You might have to mess with the tissue a bit.  Before tying off the cover, stand back and see how it looks, if you are satisfied, grab your yarn, a helper and tie it closed, very tight.

Then add what bow/bows and ribbon you like, then you are done, it is as easy as that.  This basket can be made for any occasion.  By all means add your own goodies inside, candy, cookies or a hidden present.  I promise you, the one that gets this basket, will have been given a gift they will treasure and never forget.

Valentine's Day: Part I
Valentine's Day: III

Valentine's Day Massacre:  NOT!

All photographs are the property of Denise O.  Do not use unless you get 'my' written permission. All written material is owned by Denise O, it will not be 'used' (sharing my article is different, it is acceptable and appreciated) without 'my' written permission.  Just keeping it real folks.:)